Bingo RC Designs WASP RMX Chassis w/ Extensions - Forged Blue
$110.00
NEW
Loyalty
Buy and earn $2.20 Loyalty for your next purchaseLoyalty is a discount program that lets you buy products and earn points to redeem on your next purchase. Your Loyalty balance is updated when you pay online or in-store. The Loyalty amount shown on this page can be recalculated at the checkout.
In stock: 1 available
Save this product for later
Bingo RC Designs WASP RMX Chassis w/ Extensions - Forged Blue
Product Details
Brand: Bingo Wasp
NOTE: This chassis is designed specifically for the MST RMX 2.0/2.5 and RMX-M.
Discover the pinnacle of RC drift technology with the WASP RMX R/C drift chassis, meticulously crafted by the experts at Bingo RC Designs. Developed with precision and passion on our exclusive in-house drift circuit, this chassis brings together a perfect blend of lightness, traction, and customization.
Why Choose the WASP RMX?
- Striking Design: With its distinct honeycomb and stinger details, this chassis stands out in both design and functionality.
- Customization at Its Best: Available in a myriad of colors, it's perfect for enthusiasts who love to personalize their build.
- Flexible Mounting: Experience the freedom of multiple servo and battery mounting options.
- Sleek Aesthetics: Its beveled edges ensure a smooth, premium finish.
- Weight Savings: Over 80 gram weight savings.
- Tunability: Added provision on the rear of the chassis for optional active rear toe.
Specifications:
- Weight: 77 Grams with Braces.
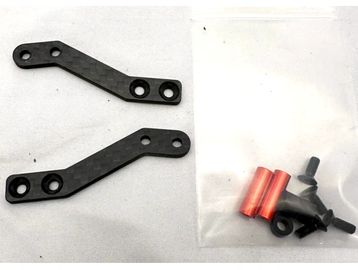
Package Contents:
- (1) WASP RMX Chassis
- (2) Chassis Braces
- (2) Extensions
- Hardware
Take your drifting experience to the next level with the WASP RMX R/C drift chassis – because in the world of RC drifting, every detail counts!
NOTE: Requires a "shorty" style battery pack
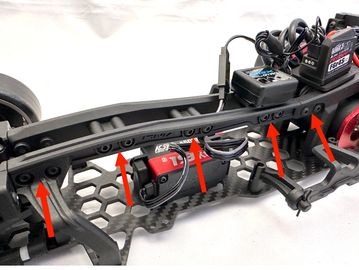
1. Stock Upper Brace
Remove the 20 screws from the stock upper brace (set the screws aside). Remove the upper brace, then transfer the front end and backend components to the Wasp RMX chassis.
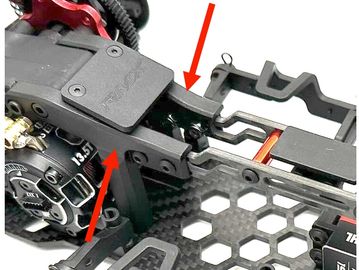
2. New Upper Brace
Assemble the new upper brace as shown, using the 3 x 15mm standoffs, and reusing 6 screws from stock brace.
3. Install New Upper Brace
Install new upper brace using 8 locknuts, reusing 8 screws from stock brace. *Note newer versions may be using embedded press nuts instead of locknuts.
4. Gyro Mount Plate
Reattach gyro mount plate to one side of the upper brace using 2 screws from stock brace. Standard setup is complete.
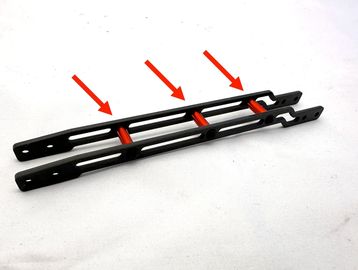
5. Optional Brace Extender
The RMX Upper Brace extender lengthens the upper brace and allows the battery to be placed more rearward when the motor is mounted hight. The brace extender also increases chassis flex. *Note newer versions use press nuts instead of the 15mm standoffs.
6. Stock Gearbox Mount
Remove the plastic gearbox front mount pieces. Retain the 30mm and 40mm screws.
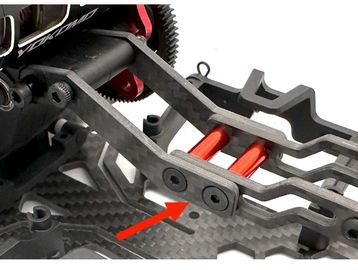
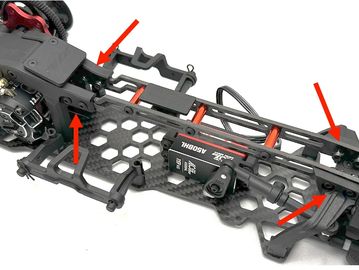
7. Attach Extensions
*Note newer versions use press nuts embedded in the brace instead of the 15mm standoffs.
Attach the upper brace extensions as shown. Use 2 x 15mm standoffs and 4 x M3x8 flat head screws.
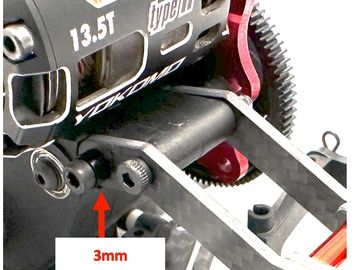
8. Gearbox Attachment
Attach the upper brace extension to the gearbox using the stock screws. Long one toward the rear, with 3mm spacer, and shorter one toward front.
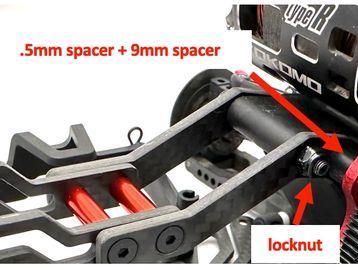
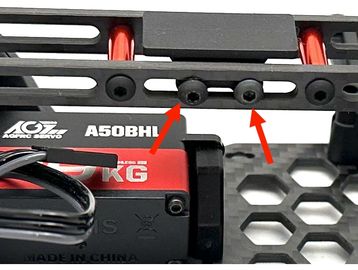
9. Gearbox Attachment
Reuse a locknut on the front screw. Install the 0.5mm spacer and 9mm spacer on rear screw. Rear screw goes into motor plate. It is recommended that the spur gear and motor plate be removed to make installation of the gearbox screws easier. *Note newer versions use an embedded press nut instead of the lock nut shown here.
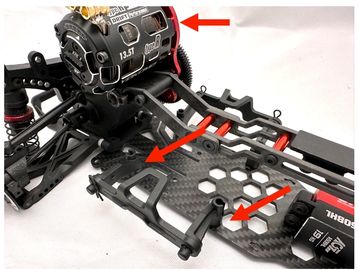
10. Battery Holder Placement
Motor can be placed in the high position, and battery cage can be moved rearward for more traction
Check out Nez0's Bad Shoppe's overview:
Display prices in:USD